
 |  |
_________________
Prepare(준비물):

update : 10.6.4 Vanilla Kernel
_________________
안되면 다음시디중에서 골라서
_________________
Alternate iBoot ATI Versions
iBoot-ATI-2 - Confirmed ATI 4870 (success) - (success)
iBoot-ATI-3 - Confirmed ATI 4850
atiwith48xx - Confirmed ATI 4870/4890
Alternate iBoot ATI Versions
iBoot-ATI-2 - Confirmed ATI 4870 (success) - (success)
iBoot-ATI-3 - Confirmed ATI 4850
atiwith48xx - Confirmed ATI 4870/4890
_________________
iBoot 혹은 Alternate iBoot CD로 안되면 폭탄 T T 다음 링크의 Boot CD 중 하나를 이용합니다.
tonymacx86 Boot CD Repository
If the recommended iBoot CD doesn't work for you, perhaps one of these will. Unfortunately there's not much documentation, as I've made these for people over the past few months as test subjects, but I thought I'd make them available here.
iBoot-PCEFI (with PC-EFI 10.6)
tonymacx86-ati
tonymacx86-BootCD-ATI
tonymacx86-BootCD-nVidia
tonymacx86-iBoot-ATI
tonymacx86-iBoot
iBoot-ATI-4
iBoot-ATI-5
iBoot-ATI-6
iBoot-ATI-7
iBoot-ATI-8
iBoot-ATI-9
iBoot-ATI-10
tonymacx86-iBootCD-atitest
tonymacx86-iBootCD-test.iso
tonymacx86-iBootCD-test2
tonymacx86-iBootCD
tonymacx86-msi-test
tonymacx86-nv2xx.iso
tonymacx86-P55BootCD-ASUS
tonymacx86-P55BootCD-ASUS2
tonymacx86-P55BootCD-ASUSnv2xx
tonymacx86-P55BootCD-ATI-b
tonymacx86-P55BootCD-ATI
tonymacx86-P55BootCD-ATI46xx-v2
tonymacx86-P55BootCD-ATI46xx
tonymacx86-P55BootCD-beta
tonymacx86-P55BootCD-beta2
tonymacx86-P55BootCD-beta3
tonymacx86-P55BootCD-Foxconn
tonymacx86-P55BootCD-Intel
tonymacx86-P55BootCD-MSI
tonymacx86-P55BootCD-nv2xx
tonymacx86-P55BootCD-nv260
tonymacx86-P55BootCD-nv285
tonymacx86-P55BootCD-OLD
tonymacx86-P55BootCD-P55A-UD4P
tonymacx86-P55BootCD
tonymacx86-PM45BootCD
tonymacx86-Universal
_________________
MultiBeast - The Ultimate Post-Installation Tool
MultiBeast installs everything you need to get your system 100% in one convenient package including Bootloader, Graphics, Sound, Network, DSDT, Kernels, Extras, and Utilities.
Features:
-Bootloaders - Choice of RC4 AsereBLN 1.1.9, RC5pre6, or PC-EFI 10.6
-Audio Kexts - LegacyHDA.kexts, HDAEnabler kexts, 2 VoodooHDA kexts
-Graphics Kexts - NVEnabler64.kext, ATY_init.kext, EVEnabler, ATI kexts
-DSDTs - All Edited DSDTs from P55 DSDT Database
-Kernels - 10.0.0 Patched kernel, 10.2.0 Patched kernel, 10.2.0 Vanilla kernel
-Kexts - All the standard Snow Leopard kexts.
-Extra - com.apple.boot.plist, smbios.plist
-Network - RealtekR1000SL.kext, Intel82566MM.kext
-Utilities - Kext Utility & ShowAllFiles
-Repairs Permissions & Rebuilds Kext Caches on /Extra/Extensions and /System/Library/Extensions.
_________________
_________________
iBoot represents what I hope to be a mostly universal solution for any Core i3/i5/i7 computer. Edit to say that it also works on other Intel Processors- tested and confirmed on Pentium 4, CoreDuo, and Core2Duo.
1. Chameleon RC4 - AsereBLN 1.1.8 with new PC-EFI 10.6 graphics code inserted!
2. GraphicsEnabler=Yes
3. Ethernet Enabled - Integrated RealtekR1000SL.kext, Intel82566MM.kext, & IONetworkingFamily.kext
4. Sound Enabled - VoodooHDA.kext
5. No DSDT- uses LegacyAppleRTC.kext by default
6. PS2 Mouse/Keyboard/Trackpad support
7. maxmem=4096 For > 4gb RAM errors
8. Updated with IDE Support AND 10.6.3 USB Fix
NOTE: Unsupported Intel i3/i5/i7s will have to add busratio at Chameleon screen after swapping
_________________
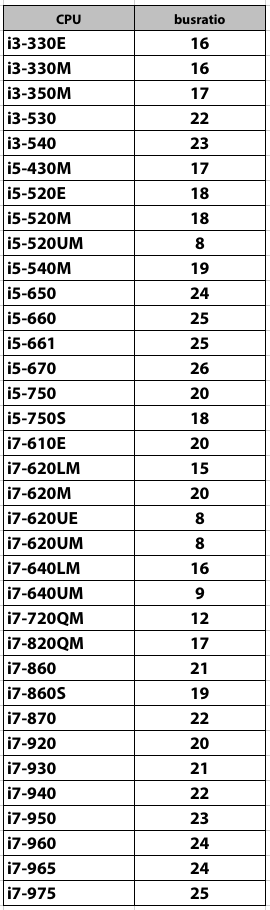
busratio= and then your specific CPU's bus/core ratio.
So, for example, the command would be
busratio=23
For a Core i3-540. Simple! But as yet untested on a lot of these.
Below is a list of the bus/core ratio taken from Intel's site for all of their 2010 lineup. Enjoy this resource!
So, for example, the command would be
busratio=23
For a Core i3-540. Simple! But as yet untested on a lot of these.
Below is a list of the bus/core ratio taken from Intel's site for all of their 2010 lineup. Enjoy this resource!
_________________
Installation
Follow Installation guide,
then choose 10.6.2 work great,
after use multibeast with just ati activation on easybeast
after use multibeast with just ati activation on easybeast
_________________
본격설치
➀iBoot CD 를 이용하여 부팅한다.
➁
UltraISO 로 반드시 2배속 혹은 4배속으로 구운 10.6.0 Snow Leopard Retail DVD 로 교체하여 주고 "F5"를 눌러준다.
➂좌.우 화살표 키를 이용하여 "Snow Leopard Install DVD"를 선택하여 준다.